Simulating a Simple 2DoF Planar Arm
So far, we’ve made our robot structure with static transformations. Now we want to bring our robot to life. A simple way to see that is using a 2 degrees of freedom (DoF) planar arm. A 2DoF planar arm has two links and two rotational joints that moves in a 2D plane, allowing the end effector to reach different places.

A simple 2 DoF planar robot arm with 2 joints
To simulate this, we will modify our urdf file to describe a moving arm. To make this, we can no longer use fixed joints, therefore we use revolute joints, that allows for rotation.
1. Create a URDF file for 2 DoF Planar Moving Arm
Here, we need to describe the robot’s physical properties so that it can be visualized. Create a new file named two_dof_arm.urdf and paste the following content into it.
<?xml version="1.0"?>
<robot xmlns:xacro="http://www.ros.org/wiki/xacro"  name="two_dof_arm">

    <material name="grey"> <color rgba="0.5 0.5 0.5 1.0"/></material>
    <material name="orange"><color rgba="1.0 0.5 0.0 1.0"/></material>
    <material name="blue"><color rgba="0.0 0.0 1.0 1.0"/></material>

    <!-- world link -->
    <link name="world"/>

    <!-- Connect world link to base link through a joint -->
    <joint name="world_to_base" type="fixed">
        <parent link="world"/>
        <child link="base"/>
        <origin xyz="1 0 0" rpy="0 0 0"/>
    </joint>

    <!-- base link -->
    <link name="base">
        <visual>
            <origin xyz="0 0 0" rpy="0 0 0"/>
            <geometry>
                <box size="0.25 0.25 0.1"/>
            </geometry>
            <material name="grey"/>
        </visual>
    </link>

    <!-- Connect base link to link1 through a joint -->
    <joint name="base_to_link1" type="revolute">
        <parent link="base"/>
        <child link="link1"/>
        <origin xyz="0 0 0.05" rpy="0 0 0"/> <!--joint at top center of base-->
        <axis xyz="0 1 0"/>  <!-- rotation about Y-->
        <limit effort="0.1" lower="-3.14" upper="0.0" velocity="0.2"/>
    </joint>

    <!-- link1 -->
    <link name="link1">
        <visual>
            <origin xyz="0.75 0 0" rpy="0 1.57 0"/>
            <geometry>
                <cylinder length="1.5" radius="0.03"/>
            </geometry>
            <material name="orange"/>
        </visual>
    </link>

    <!-- Connect link1 to link2 through a joint -->
    <joint name="link1_to_link2" type="revolute">
        <parent link="link1"/>
        <child link="link2"/>
        <origin xyz="1.5 0 0" rpy="0 0 0"/>
        <axis xyz="0 1 0"/>
        <limit effort="0.1" lower="-3.00" upper="3.00" velocity="0.2"/>
    </joint>

    <!-- link2 -->
    <link name="link2">
        <visual>
            <origin xyz="0.5 0 0" rpy="0 1.57 0"/>
            <geometry>
                <cylinder length="1" radius="0.03"/>
            </geometry>
            <material name="blue"/>
        </visual>
    </link>
</robot>
Here, materials are used to define colors, for visualization purposes, so that each each links have different colors.
Explanation of the urdf file:
- We start by creating a
worldlink, a fixed reference frame. - The
world_to_basejoint (typefixed) attaches thebaselink to the world at position (1,0,0). - The
baselink is a grey box (size 0.25m x 0.25m x 0.1m), representing robot’s stationary base. - The
base_to_link1joint (typerevolute) connects thebasetolink1, placed 0.05m above the base (0.1m height of base link box / 2 = 0.05m) and rotating about the Y-axis (shoulder joint). - The
link1is a white cylinder (length 1.5, radius 0.03) oriented along the x-axis, representing first arm segment. - The
link1_to_link2joint (alsorevolute) connectslink1tolink2at (1.5, 0, 0), rotating about the Y-axis (elbow joint). - The
link2is a blue cylinder (length 1.0, radius 0.03) oriented along the X-axis, representing the second arm segment.
For more details about how to create a URDF file, visit here. (But don’t worry about it, you’ll find it online)

2 DoF planar arm visualization in RViz
2. Moving the Arm
To control and view the arm, we need to run robot_state_publisher. We have done this above. Let’s try running the same command with our new urdf file and see what happens.
ros2 run robot_state_publisher robot_state_publisher --ros-args -p robot_description:="$(cat two_dof_arm.urdf)"
Now, before moving the robot, we can inspect the tf tree using view_frames to see the frames, like before, using the following command in a separate terminal:
ros2 run tf2_tools view_frames
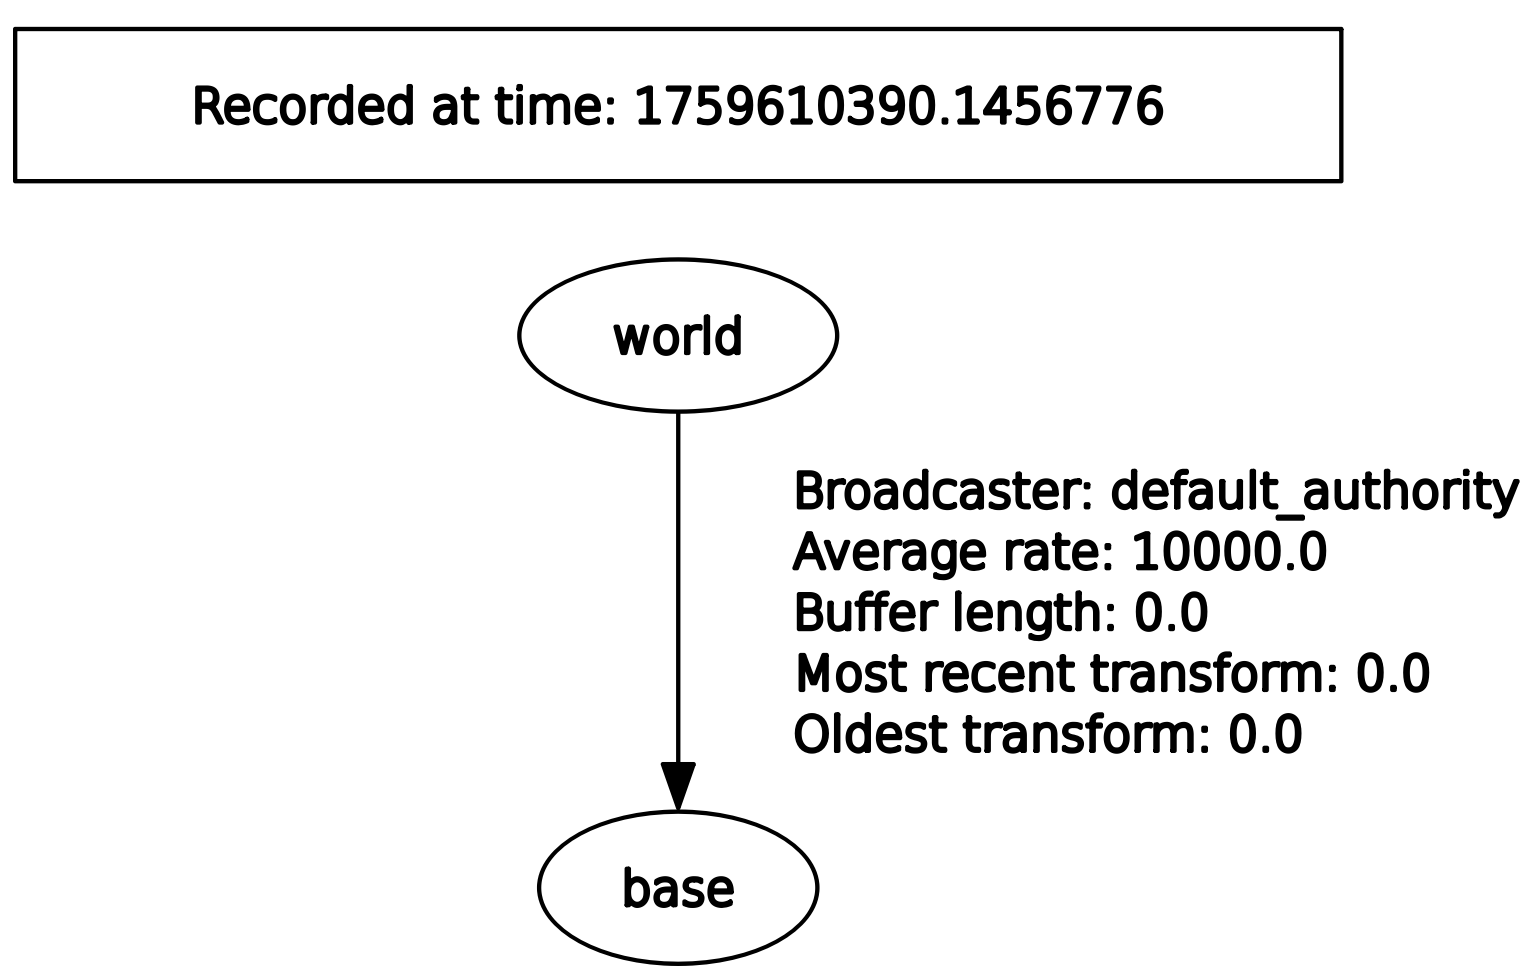
Now, we don’t see link1 and link2. Is something’s wrong?
2.1. Visualizing using ROS Vizualizer (RViz)
Rviz is a visualizer tool for ROS that allows user to visualize sensor data, robot models, transforms and much more.
Let’s open Rviz to load our model there. In a terminal, run:
rviz2
In Rviz:
- under
Global Options > Fixed Frame, If you change it tobase, and - under
RobotModel > Description Topic, If you set it to/robot_description, you’ll see something like this:
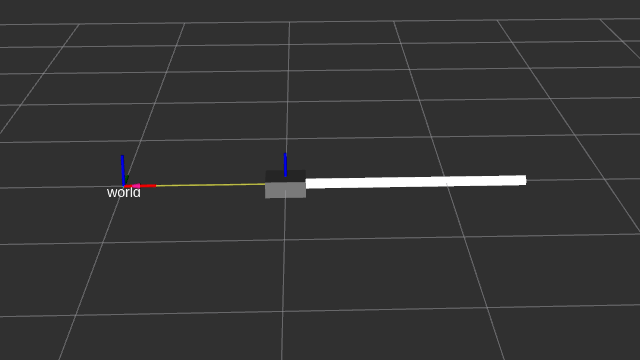
Visualizing our 2DOF Planar Arm in Rviz. (Joints not seen properly)
The reason you only see
world → baseinview_framesand not other joints (base_to_link1,link1_to_link2) is because the joints after the fixed one are revolute joints, and therobot_state_publisherneeds joint state information (from the/joint_statestopic) to publish transforms for them.
2.2. Using Joint State Publisher to Publish to /joint_states
Joint state publisher is a tool that provides a simple graphical interface with sliders for each non-fixed joint defined in the URDF. When you move a slider in joint state publisher, it publishes the joint’s position to a topic called /joint_states.
Open a new terminal and run the following command:
ros2 run joint_state_publisher_gui joint_state_publisher_gui
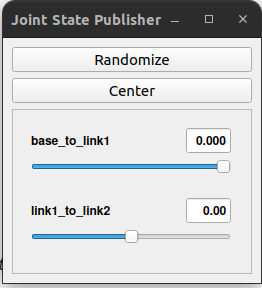
Joint state publisher gui
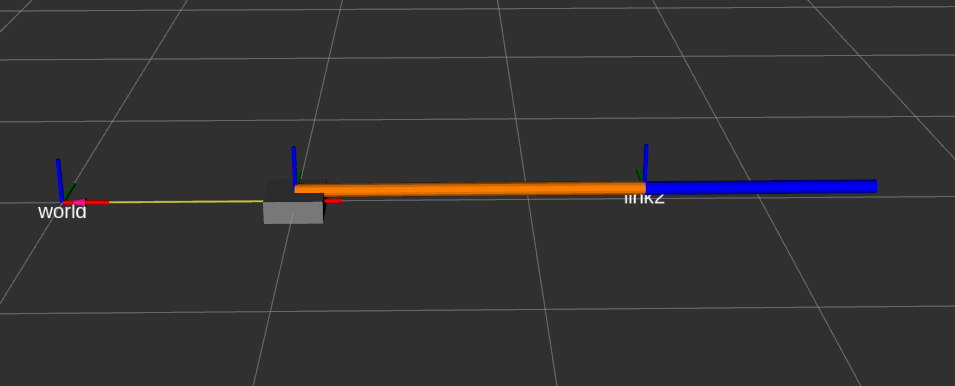
Rviz
Here, in the Joint State Publisher Gui, you can see that we have two sliders, each for two revolute joints. The values that we can publish to those joints are capped at the value we set for those joints (i.e., for base_to_link1 joint (-3.14 to 0); and for link1_to_link2 (-3.00 to 3.00) degrees in radians). When you change the value through sliders, you can see the arm moving.
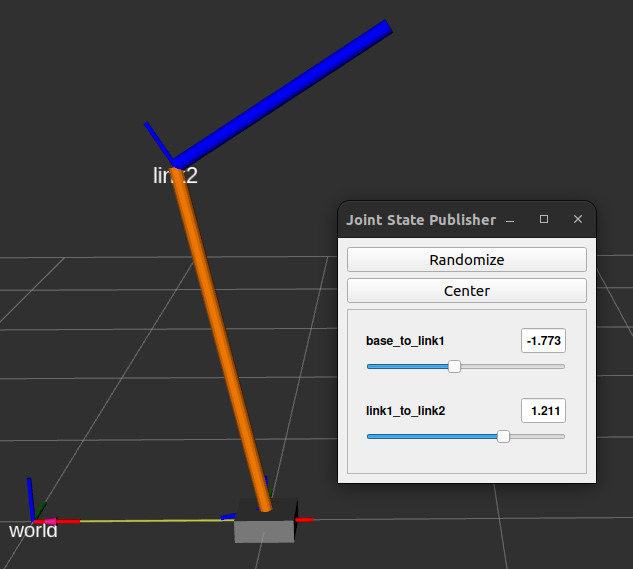
Moving the arm by changing joint values in Joint State Publisher GUI
You can also verify the transforms using view_frames . Open a new terminal and type:
ros2 run tf2_tools view_frames

Viewing frames using view_frames
Everything works. Now, instead of running on different terminal manually each time, we will write a script to run everything that we need at once.
3. Using Launch File to Run Everything
The tools that we used till now are:
robot_state_publisher: To read urdf, and listens for joint positions to calculate the TF.joint_state_publisher_gui: To provide a graphical user interface with sliders to publish joint_states.rviz2: for visualization.
We ran each of these three nodes in separate terminals. This is tedious. A launch file is the standard ROS2 way to start a collection of nodes all at once.
For that, create a file named view_arm.launch.py in the same folder as two_dof_arm.urdf, and paste the following content:
import os
from launch import LaunchDescription
from launch_ros.actions import Node
import xacro

def generate_launch_description():

    urdf_path = os.path.join(
        # This is a dummy package name, update it if you have a real package
        # For now, we assume the launch file is in the same folder as the URDF
        '.',
        'two_dof_arm.urdf'
    )
    robot_description = xacro.process_file(urdf_path).toxml()

    # 1. Robot state publisher node
    robot_state_publisher_node = Node(
        package='robot_state_publisher',
        executable='robot_state_publisher',
        name='robot_state_publisher',
        output='screen',
        parameters=[{'robot_description': robot_description}]
    )

    # 2. Joint State Publisher node
    joint_state_publisher_gui_node = Node(
        package='joint_state_publisher_gui',
        executable='joint_state_publisher_gui',
        name='joint_state_publisher_gui',
        output='screen'
    )

		# 3. Rviz2 Node
    rviz_node = Node(
        package='rviz2',
        executable='rviz2',
        name='rviz2',
        output='screen'
    )
    ld = LaunchDescription()
    ld.add_action(rviz_node)
    ld.add_action(robot_state_publisher_node)
    ld.add_action(joint_state_publisher_gui_node)
    return ld
In the code, we first use a xacro processor to load the robot_description urdf file in a plain URDF string. (URDF is initially in plain XML, xacro processor would substitute values and macros—if defined, and make it a plain string).
Then we run robot_state_publisher, joint_state_publisher_gui, and rviz2 like we did in terminal.
You can run this using the command below in a terminal:
ros2 launch view_arm.launch.py
Everything should work like before, but now using a launch file.
💡 On a side note
You may need to install
ros-humble-xacrofirst. I think everything is installed when humble-full-desktop is installed. If not, you can dosudo apt-get install ros-humble-xacro